Category: TFS
Queue a Team Build from another and pass parameters
I have previously blogged about queuing a new Team Build at the successful completion of another Team Build for Team Foundation Server 2010. Since then I’ve had a few people ask how to queue a new Team Build and pass information into the new Team Build via the build process parameters. Recently I’ve needed to implement this exact behaviour for a client, and with TFS 2013 which has quite different default build process templates, so I thought I’d share it here.
In my situation I’m building on top the default TfvcTemplate.12.xaml process but the same approach can be easily applied to the Git build templates too. To begin, I have added two build process parameters to the template:
- Chained Build Definition Names – this is an optional array of strings which refer to the list of Build Definitions that should be queued upon successful completion of the current build. All the builds will be queued immediately and will execute as the controller and agents are available. The current build does not wait for the completion of the builds it queues. My simple implementation only supports queuing builds within the same Team Project.
- Source BuildUri – this is a single, optional, string which will accept the unique Team Build identifier of the previous build that queued it – this is not intended to be specified by a human but could be. When empty, it is ignored. However, when provided by a preceding build, this URI will be used to retrieve the Build Number and Drop Location of that preceding build and these values, plus the URI, will be made available to the projects and scripts executed within the new build. Following the new Team Build 2013 convention, these values are passed as environment variables named:
- TF_BUILD_SOURCEBUILDURI
- TF_BUILD_SOURCEBUILDNUMBER
- TF_BUILD_SOURCEDROPLOCATION
The assumption is that a build definition based on my “chaining” template will only queue other builds based on the same template, or another template which also accepts a SourceBuildUri parameter. This also means that builds can be chained to any depth, each passing the BuildUri of itself to the next build in the chain.
The projects and scripts can use the TF_BUILD_SOURCEDROPLOCATION variable to access the output of the previous build – naturally UNC file share drops are easier to consume than drops into TFS itself. Also the TF_BUILD_SOURCEBUILDURI means that the TFS API can be used to query every aspect of the preceding build, notably including the Information Nodes.
Prior to TFS 2012, queuing a new build from the workflow and passing parameters would have required a custom activity. However, in Team Build 2012 and 2013, Windows Workflow 4.0 is used which includes a new InvokeMethod activity making it possible to add items to the Process Parameters dictionary directly from the XAML.
The final XAML for the Build Process Template with support for queuing and passing parameters is available as a Gist. If you’d like to be able to integrate the same functionality with your own Team Build 2013 template you can see the four discrete edits I made to the default TfvcTemplate.12.xaml file from TFS 2013 in the Gist revisions.
When a build using this chaining template queues another build it explicitly sets the RequestedFor property to the same value as the current build so that the chain of builds will show in the My Builds view of the user who triggered the first build.
In my current implementation, the SourceBuildUri passed to each queued build is the URI of the immediately preceding build, but it some cases it may be more appropriate to propagate the BuildUri of the original build that triggered the entire chain. This would be a somewhat trivial change to the workflow for whomever needs this behaviour instead.
Effectively comparing Team Build Process Templates
I always prefer implementing .NET build customizations through MSBuild and I avoid modifying the Windows Workflow XAML files used by Team Build. However, some customizations are best implemented in the Team Build process, like chaining builds to execute in succession and pass information between them. As a consultant specializing in automated build an deployment I also spend a lot of time understanding Workflow customizations implemented by others.
For me the easiest way to understand the customizations implemented in a particular Team Build XAML file is to use a file differencing tool to compare the current workflow to a previous version of the workflow, or even to compare it to the default Team Build template it was based on. Unfortunately, the Windows Workflow designer in Visual Studio litters the XAML file with a lot of view state, obscuring the intended changes to the build process amongst irrelevant designer-implementation concerns.
To address this problem, I wrote a PowerShell script (available as a GitHub Gist) which removes all the elements and attributes from the XAML file which are known to be unimportant to the process it describes. Conveniently, the XAML file itself lists the set of XML namespace prefixes that can be safely removed in an mc:Ignorable attribute on the root document element.
Typically I use my XAML cleaning PowerShell script before each check-in to ensure the source control history stays clean but I have also used it on existing XAML files created by others to canonicalize them before opening them in a diff tool.
Using the script is as simple as:
.\Remove-IgnoreableXaml.ps1 -Path YourBuildTemplate.xaml
Or, if you don’t want to overwrite the file in place, specify an alternate destination:
.\Remove-IgnoreableXaml.ps1 -Path YourBuildTemplate.xaml -Destination YourCleanBuildTemplate.xaml
Override the TFS Team Build OutDir property in TFS 2013
I’ve blogged twice before about the OutDir MSBuild property set by Team Build and I’ve recently discovered that with the default build process templates included with Team Foundation Server 2013, the passing of the OutDir can be disabled via a simple Team Build process parameter.
The parameter I am referring to is the “Output location”:
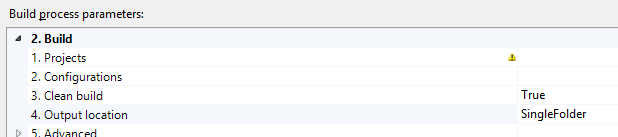
This parameter’s default value, “SingleFolder”, gives the traditional Team Build behaviour – the OutDir property will be specified on the MSBuild command-line and, unless you’ve made other changes, all build outputs will be dropped into this single folder.
Another value this parameter accepts is “PerProject” but this name can be slightly misleading. The OutDir property will still be specified on the MSBuild command-line but Team Build will append a subfolder for each project that has been specified in the Build Definition. That is, you may choose to build SolutionA.sln and SolutionB.sln from a single Build Definition and the “PerProject” option will split these into “SolutionA” and “SolutionB” subfolders. It will not output to different subfolders for the projects contained within each solution – for this behaviour you should specify the GenerateProjectSpecificOutputFolder property as an MSBuild argument as I’ve blogged previously.
The value of the “Output location” that you’ve probably been looking for is “AsConfigured”. With this setting, Team Build will not pass the OutDir property to MSBuild at all and your projects will all build to their usual locations, just like they do in Visual Studio – presumably to a \bin\ folder under each project. With this setting, it is then your responsibility to configure a post-build target or script to copy the required files from their default build locations to the Team Build binaries share. For this purpose, Team Build provides a “TF_BUILD_BINARIESDIRECTORY” environment variable specifying the destination path to use. There are also some other environment variables populated by Team Build 2013 documented here.
At the end of the build process, Team Build will then copy the contents of the TF_BUILD_BINARIESDIRECTORY to either the UNC path drop folder, or to storage within the TFS Collection database itself as you’ve chosen via the Staging Location setting on the Build Defaults page.
However, before you rush away to use this new capability, consider that the MSBuild, or more accurately the set of Microsoft.*.targets files used by almost all projects, already contain a great quantity of logic for handling which files to copy to the build drop. For example, Web Application projects, will copy the contents of the \bin\ folder and all the other content files (eg css, javascript, and images) whilst excluding C# code files, and the project file. Instead of re-implementing this behaviour yourself, leverage what MSBuild already provides and use the existing hook points to adjust this behaviour when you need to alter it for your situation.
If you’re interested, you’ll find that this new “Output location” behaviour is now implemented in the new RunMSBuild workflow activity, specifically within its RunMSBuildInternal private nested activity.
Update NuGet.exe version used by Team Build 2013 Package Restore
Since NuGet 2.7, there is a new approach to Package Restore. In short, it involves executing “nuget.exe restore” before building the solution or project, instead of having each project import the “nuget.targets” file. This new restore workflow solves a number of issues, especially with packages containing MSBuild customizations, but also with parallel builds conflicting when performing the restore in parallel.
Additionally, Team Foundation Server 2013’s Team Build implements this new Package Restore workflow in its default build process templates for both TFVC and Git repositories without any effort. This functionality is implemented care of the new RunMSBuild workflow activity (not to be confused with the original MSBuild workflow activity).
The RunMSBuild activity internally uses another new activity named “NuGetRestore”, which is also conveniently a public type you can use directly in customized build process templates. The NuGetRestore activity simply runs “nuget.exe” via the InvokeProcess activity to perform the real work, so there is no special TFS-only behaviour.
However, by default, the copy of “nuget.exe” that is used for the restore is located in the same folder as the assembly declaring the NuGetRestore activity (Microsoft.TeamFoundation.Build.Activities.dll) typically located in “C:\Program Files\Microsoft Team Foundation Server 12.0\Tools”. The version of this “nuget.exe” that ships with TFS 2013 RTM is version 2.7 but there is a good chance there will regularly be a newer NuGet available than the version shipped with Team Build, and with features you need or want. For example, version 2.8 was recently released and the new Fallback to Local Cache feature would be one handy way to improve build resiliency when the build agent can’t always connect to a NuGet repository.
I’ve done some research and I have found there are basically two options available for using a newer version of NuGet in your Team Builds now:
- Remote to each Team Build Agent with local Administrator privileges, and execute “nuget.exe update -self” on the file located in the TFS Tools folder mentioned above, or …
- Customize your build process XAML file in two places:
- Set the “RestoreNuGetPackages” argument to “false” on the RunMSBuild activity to avoid using the default “nuget.exe”.
- Insert the NuGetRestore activity immediately before RunMSBuild set the “ToolPath” argument to the location of the desired version of “nuget.exe” to use.
With any luck, each future TFS update will ship with the most recent version of NuGet for those builds that can wait.
WitMorph – Walkthrough a Conversion
In my last post I described the problem of trying to change the Process Template of an existing Team Project in Team Foundation Server and the open-source project I built to solve it, WitMorph. In this post I want to demonstrate a simple walkthrough of the currently even simpler GUI.
I have a Team Project, imaginatively named “Agile-6.1”, and it was originally created with the “MSF for Agile Software Development 6.1” process template. I also have another Team Project, named “Scrum-2.1”, and it was created with the “Microsoft Visual Studio Scrum 2.1” process template which should be no surprise.
I am going to describe the process of converting the “Agile-6.1” Team Project to the Scrum template by using the “Scrum-2.1” Team Project as the definition of the goal. The reason for using another Team Project as the definition instead of the original process template is due to subtle differences between a template’s structure and the resulting Team Project that I haven’t addressed in WitMorph’s differencing engine yet.
The very first step is to pull and build the WitMorph solution and then run UI project. It should look like this:
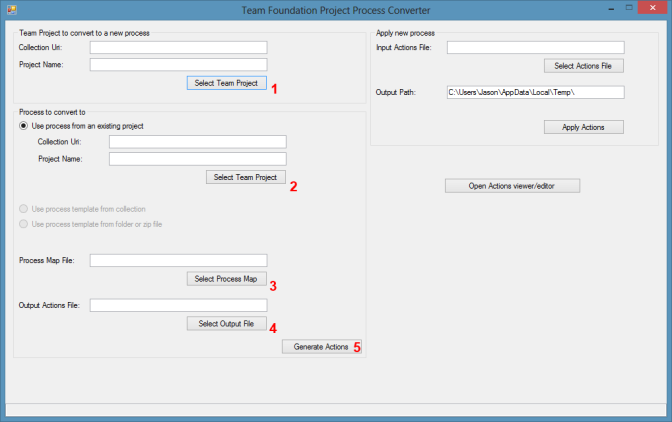
Following the numbers I’ve added to the screenshot above, click each of the buttons to select:
- The “Agile-6.1” Team Project. Clicking the button will reveal the standard TFS Team Project dialog.
- The “Scrum-2.1” Team Project. In my example both Team Projects are in the same collection but they could be on different TFS instances entirely.
- The “Agile6.1_to_Scrum2.1.witmap” Process Map File. This file can be found in the WitMorph project source under the ProcessTemplateMaps folder*.
- A file to which to save the generated action list.
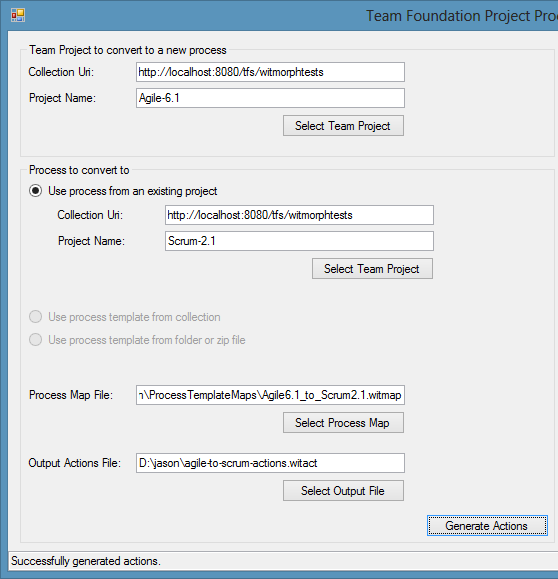
It is important to note that when the “Generate Actions” button (5) is clicked, the two Team Projects will be queried for their current process metadata but no changes will be applied. After providing the required information and clicking the button the UI should look like this:
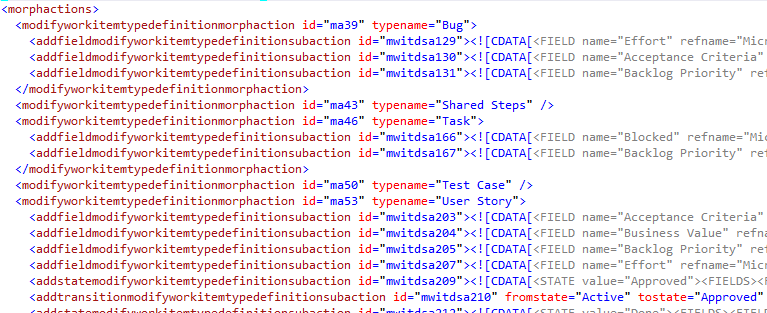
The contents of the generated “witact” file are not intended for human consumption but it is fairly comprehensible. It describes the series of incremental steps required to convert any Team Project based on the Agile template to the Scrum template:
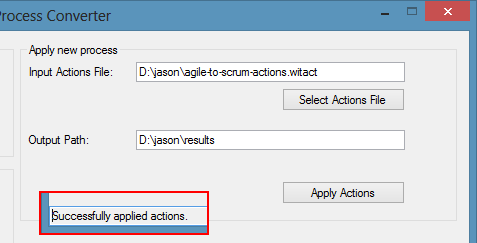
Now, we can apply the list of actions in this file to the “Agile-6.1” Team Project:
- Leave the “Agile-6.1” Team Project selected as per step 1 above, or re-select it if WitMorph has been restarted since the action list was generated. You could also choose a different project to convert if it is also based on the same Agile 6.1 process.
- Select the action list file generated above as the “Input Actions File”.**
- Specify an Output Path where the process of applying the actions will output a log and the intermediate work item type definitions (mainly for diagnosing issues).
- Click “Apply Actions” to convert the Team Project to the new process template. WARNING: I highly recommend having a backup of the TFS collection database before doing this.***
The WitMorph UI should look like this:
Upon connecting**** to the “Agile-6.1” Team Project with Visual Studio, you will find that all the existing User Story work items have become Product Backlog Items with all their original work item IDs, attachments, links, and history. You will also find that you can now create new Impediment work items instead of Issues and the Bug work items now have a Backlog Priority field among many other differences between the two templates.
There is still a lot of room for improvement in WitMorph (eg to update the work item queries) and if you’d like to contribute, simply fork the GitHub repository and send a Pull Request.
Footnotes
*These process maps can be improved and shared by the community for common conversion scenarios. I’d like to build an editor for this file format in the future.
**Aside from being able to re-use an action list for multiple conversions, the primary reason for separating the step of generating the list from applying the list is so that some steps can be excluded. For example, you may wish to keep a field that would otherwise be removed. Again, I’d like to build an editor for selecting actions to apply in the future.
***I find it best to backup the collection database while the collection is detached. This requires a brief outage but can be automated to happen during periods of low activity and makes restoring much easier.
****If you already had Visual Studio connected to the Team Project before conversion you may need to restart Visual Studio to force it to refresh the metadata.
WitMorph – changing Team Foundation process templates in-place
Background
Historically Team Foundation Server process templates have not had a good upgrade story. When you create a new Team Project you are required to select the process template (typically CMMI, Agile, or recently Scrum) and that is the process template used by your project for the rest of its life.
From the first TFS version, customizing the project has always been possible – adding and removing fields to work items, or adding entirely new work item types, and the TFS Power Tools certainly improve that experience by providing a GUI instead of a wall of XML and a command-line. But when a new version of TFS ships with new versions of the process templates you’ve either had to create a new Team Project with the new template and try to copy most* of the data across, or hope someone publishes a way to upgrade between specific process template versions – typically another exercise in tedious manual XML manipulation. If you’ve chosen the wrong process template and want to change from Agile to Scrum then I really don’t envy the work ahead of you.
Team Foundation Server 2012 included a wizard in Web Access for the first time to help add to an existing Team Project the process template components needed to enable the Task Board and Code Review functionality but it doesn’t upgrade the template completely, it only works with TFS 2010 templates or newer, and will be limited by any customizations that may have been made.
Having performed many TFS upgrades for equally many clients over the years, I’ve often had to perform the manual analysis of the differences between various versions of a TFS process template or a client’s custom template, and find a way to migrate from one to the other. I’ve always felt that this process could be approached much like a database migration would and could be automated. This year I finally had the opportunity to try it.
A Series Of Incremental Changes
Take a simple scenario of one of the differences between Microsoft’s Agile and Scrum templates – the former has a User Story work item with a Stack Rank field and the latter has a Product Backlog Item work item with a Backlog Priority field. In each template, this field is used to provide a number to specify the relative ordering of the work to be done.
To convert a Team Project from the Agile template to the Scrum template I would need to rename the “User Story” work item to “Product Backlog Item” instead, typically via the “witadmin renamewitd” command line tool, and I would also need to rename the “Microsoft.VSTS.Common.StackRank” field to “Microsoft.VSTS.Common.BacklogPriority” but TFS doesn’t have a mechanism for renaming a field’s reference name (only the Display Name). To rename the field, I need to perform three discrete steps instead:
- Add the Backlog Priority field to the User Story work item type definition in addition to the Stack Rank field and import the new definition into the existing Team Project.
- Copy the value of the Stack Rank field on every existing User Story work item in the Team Project into the Backlog Priority field.
- Remove the Stack Rank field from the User Story work item type definition and import it again.
There is also a similar process required when the work item states are different between two work item definitions. As you can imagine, the process for determining, and then executing each of these steps for each individual field and state on each work item type is time consuming and error prone but it also very algorithmic.
A Comparison, a Map, and an Action List
The approach I have used for automatically calculating and applying the incremental changes begins with finding the differences between the templates. Using the Agile-to-Scrum conversion scenario again, some key differences that would be detected are:
- The User Story and Issue work item types are removed in the Scrum template.
- The Product Backlog Item and Impediment work item types are added in the Scrum template.
- The Task work item type still exists but:
- The New, Active, and Closed states are removed.
- The To Do, In Progress, and Done states are added.
As you can see from this list, a pure set of differences is insufficient. I don’t want to delete all the User Story work items, I want to convert them to Product Backlog Item work items. So I need to define a map like this:
- User Story work item => Product Backlog Item work item.
- Issue work item => Impediment work item.
- Task work item => Task work item.
- New state => To Do state.
- Active state => In Progress state.
- Closed state => Done state.
This map can then be applied to the simple differences and produce something more useful:
- The User Story work item type is renamed to Product Backlog Item
- The Stack Rank field is renamed to Backlog Priority
- The Issue work item type is renamed to Impediment
- The Task work item’s New state is renamed to To Do.
It is important to note that maps are directional – a User Story has Active, Resolved, and Closed states but a PBI has Approved, Committed, and Done states which don’t perfectly align 1-to-1 and will be mapped slightly differently depending on the direction of the conversion.
Finally, from a mapped difference list, an ordered Action list can be determined:
- Add Backlog Priority field to the User Story work item.
- Add To Do state to Task work item.
- Copy Stack Rank field value on all User Story work items to the Backlog Priority field.
- Change all Task work items in the New state to be in the To Do state instead.
- Remove the Stack Rank field from the User Story work item.
- Remove the New state from the Task work item.
- Rename the User Story work item type to “Product Backlog Item”.
While it is an arbitrary decision to rename the work item types at the end instead of the beginning, the order of the other actions is more critical – I cannot change Tasks to the To Do state until that state has been defined. Also, while the order implies some dependencies between actions, these dependencies have varying importance. For example, the Backlog Priority field *must* be added before values are copied to it, but it is reasonable to decide to remove the Stack Rank field without copying the data.
The Code
WitMorph (Work Item Type Morph) started as a proof-of-concept code base to see if the idea of automating this process would even work. Once I had successfully tested a few basic scenarios I started to refactor the code toward something more maintainable and testable. At the moment the structure of WitMorph can be broken down as follows:
- The WitMorph class library. The core functionality for the approach described above. It handles:
- Reading the description of a process template from an active Team Project, a Collection’s template store, or a process template folder on disk.
- Defining a map between two process templates.
- Comparing two process templates and generating a list of differences.
- Converting a list of differences into an ordered list of actions.
- Applying the list of actions to an active Team Project.
- A very basic WitMorph.Console command line program to drive a Scrum 2.0 to Agile 6.0 conversion for the given TFS Collection URI and Team Project names provided as parameters.
- A work-in-progress WitMorph.UI Windows Forms** program to walk a user though the process of selecting the Team Project, the Process Template, and the template map, finding the differences, generating an action list, and choosing which actions to apply.
- A small set of automated tests which restore a TFS collection, perform a conversion, and repeat – rather infrastructure heavy by nature. Mocking TFS in these tests are of little value because TFS’ idiosyncrasies are key to successfully testing process template conversions.
The code for WitMorph is completely open source and hosted on GitHub here: https://github.com/codeassassin/WitMorph
In my next post I walkthrough converting a process template.
Footnotes
*Most processes for copying work item data between Team Projects will lose attachments, links, and history. The more comprehensive processes (ie TFS Integration Platform) for copying data will keep these items but the history will contain the time stamps and user details of the person performing the migration, not the original audit data.
**I’d rather have a WPF GUI but my personal WPF skills would only have impeded my ability to deliver something useful, quickly. If you would like to build the WPF GUI, just send a pull request.
Upgrade Visual Studio Scrum 1.0 Team Projects to version 2.0 on TFS 2012
Team Foundation Server 2010 shipped with two default Process Templates, one for Agile and another for CMMI, but Microsoft also provided a third template for Scrum teams as a separate download. With the recent release of Team Foundation Server 2012, the latest version of this additional template (Microsoft Visual Studio Scrum 2.0) is not only included in-the-box but is also now the default template for new Team Projects.
If you move from TFS 2010 to TFS 2012 and upgrade your existing Team Projects in the process, your existing Microsoft Visual Studio Scrum 1.0 Team Projects will stay as version 1.0. The new and very improved Web Access in TFS 2012 will give you the option to modify the process of an existing project slightly to enable some new TFS 2012 features but your projects will still be mostly version 1.0. A feature-enabled Scrum 1.0 Team Project will still differ from a new Microsoft Visual Studio Scrum 2.0 Team Project in these aspects (of varying impact):
- Using Microsoft.VSTS.Common.DescriptionHtml field for HTML descriptions work items instead of the new HTML-enabled System.Description field.
- Missing ClosedDate field on Tasks, Bugs and Product Backlog Items.
- Missing extra reasons on Bug transitions.
- Sprint start and finish dates still in Sprint work items, instead of on Iterations.
- Queries still based on work item type instead of work item category.
- Old Sprint and Product Backlog queries.
- Missing the new “Feedback” work item query.
- Missing extra browsers and operating systems in Test Management configuration values.
- Old reports.
While these differences may be subtle now, they could become critical when adopting third party tooling designed only to work with the latest TFS process templates, or when trying to upgrade to the next revision of TFS and making the most of its features. For me though, having existing projects stay consistent with new Team Projects I create is probably the most important factor. As such I’ve scripted most of the process for applying these changes to existing projects as they can be rather tedious, especially when you have many Team Projects.
The script and related files are available on GitHub.
To use the script, open a PowerShell v3 session on a machine with Team Explorer 2012 installed. The user account should be a Collection Administrator. The upgrade process may run quicker if run from the TFS Application Tier, in which case the PowerShell session should also be elevated. Ensure your PowerShell execution policy allows scripts. Run the following command:
<path>\UpgradeScrum.ps1 -CollectionUri http://tfsserver:8080/tfs/SomeCollection -ProjectName SomeProject
Swap the placeholder values to suit your environment. The ProjectName parameter can be omitted to process all Team Projects or you can specify a value containing wildcards (using * or ?).
Aside from fixing most of the differences listed above, the script will copy Sprint dates to their corresponding Iterations and also copy the description HTML from the old field to the new System.Description field. The script will also map the default Team to the existing areas and iterations. The Sprint work item type will remain in case you have saved important Retrospective notes as the new TFS 2012 template doesn’t not have a corresponding field for this information.
One step my upgrade script doesn’t do yet is upload the new Reports but that can be achieved just as easily with the “addprojectreports” capability of the TFS Power Tools (the Beta version works with RTM).
Also, for anyone who used TFS 11 Beta or TFS 2012 RC and has created Team Projects based on the Preview 3 or Prevew 4 versions of the Scrum 2.0 template, my script will also upgrade those projects to the RTM version of the template. I later plan to implement a similar script to upgrade existing Agile 5.0 Team Projects to the new Agile 6.0 process template.
Warning: If you have customized your work item type definitions from their original state (eg added extra fields) there is potential for the upgrade to fail or maybe even data to be lost. However I have upgraded at least 10 Team Projects so far, all successfully. As the script is written in PowerShell, the implementation is easily accessible for verification or modification to suit your needs.
Override the TFS Team Build OutDir property in .NET 4.5
Update: with Team Build 2013 it is easier still.
I’ve blogged before about the challenge of overriding the OutDir MSBuild property set by Team Build but this hassle is gone in version 4.5 of the .NET Framework.
I stumbled upon a change to the core Microsoft.Common.targets file while trying to understand some build issues with a work project and discovered new logic to modify the OutDir property depending on a variety of conditions. I went searching through the rest of the file for other references to OutDir and also discovered at the top of the file, a new attribute on the Project element. This new attribute’s name is “TreatAsLocalProperty” and it’s value is simply “OutDir”.
As at the time of posting this blog entry I could not find any documentation of this new functionality but based on my own testing I found that .NET Framework 4.5 now supports:
- Overriding the value of an MSBuild property that was specified at the MSBuild command-line by naming that property in the TreatAsLocalProperty attribute at the top of the build project.
- OutDir can now be specified at the command-line without a trailing slash and it will be corrected for you instead of failing the build.
- Projects can automatically build to subfolders of the Team Build drop location by setting a new MSBuild property named “GenerateProjectSpecificOutputFolder” to “true”.
- The project-subfolder will be named the same as the project file but can be overridden by specifying an alternate value for the “ProjectName” MSBuild property.
- The OutDir property can now be overridden in whatever custom way you like without modification of the Team Build workflow xaml or using a before-solution targets file.
And because .NET 4.5 is an addition to .NET 4 in the same way .NET 3.5 and .NET 3.0 were to .NET 2.0, your existing .NET 4/VS2010 projects can benefit from this new build-time functionality without taking on new run-time dependencies (with some exceptions). Here is a screenshot for how to configure Team Build 11 or a Team Build 2010 server with .NET 4.5 installed to create per-project folders in the build drop:

TFS Lab Build needs to start the environment
Most of the Team Foundation Server virtual lab environments I work with use snapshots that are taken while the lab virtual machines are running. When configuring a Build Definition with the default lab build process template (LabDefaultTemplate.xaml) and choosing to restore the environment to one of these snapshots everything just works. However, the guidance from Microsoft around taking snapshots of certain virtual machines (primarily Active Directory domain controllers and occasionally SQL Servers) is to shutdown the VMs first before taking the snapshot.
In recent work with a lab containing a domain controller, we’ve followed the recommendation of performing the snapshot while the VM is off. As a result of this I’ve discovered that the default lab build process template will restore to the selected snapshot and wait 20 minutes for the workflow capability of the environment to become ready and then fail. It never checks if the environment is started and never attempts to start it.
I’ve since added a call to the GetLabEnvironmentStatus and StartLabEnvironment activities into the lab build process template just after the “Restore Snapshot” sequence and before the “Do deployment” sequence so the environment gets started if it isn’t already running.
The full customised build process template is available as a Gist. The changes are small though – first a new variable definition is inserted at line 30:
<Variable x:TypeArguments="mtlc:LabEnvironmentState" Name="LabEnvironmentState" />
And then 6 lines are inserted at line 81 (was line 80 before the above line was added):
<mtlwa:GetLabEnvironmentStatus LabEnvironmentUri="[LabEnvironmentUri]" Result="[LabEnvironmentState]" DisplayName="Get Lab Environment State" />
<If Condition="[LabEnvironmentState <> Microsoft.TeamFoundation.Lab.Client.LabEnvironmentState.Running]" DisplayName="If Lab Environment Not Running">
<If.Then>
<mtlwa:StartLabEnvironment LabEnvironmentUri="[LabEnvironmentUri]" DisplayName="Start Lab Environment"/>
</If.Then>
</If>
A very similar change will be required in TFS 11 because its lab build process still won’t start an environment. Apparently this is to avoid making assumptions about the order in which each VM in a lab should be started.
Test Attachment Cleaner Least Privilege
I manage a Team Foundation Server 2010 instance with at least 30 Collections each with several Team Projects. Even after installing the TFS hotfix to reduce the size of test data in the TFS databases we still accrue many binary files care of running Code Coverage analysis during our continuous integration builds. As such it is still necessary to run the Test Attachment Cleaner Power Tool regularly to keep the database sizes manageable.
The Test Attachment Cleaner however is a command-line tool which requires the Collection Uri and the Team Project Name among several other parameters so I first needed to write a script (I chose PowerShell) to query TFS for all the Collections and Projects and call the Cleaner for each. I then needed to configure this script (and therefore the Cleaner) to run as a scheduled task and I needed to specify which user the task would run as.
The easiest answer would be to run the task as a user who has TFS Server Administrator privileges to ensure the Cleaner has access to find and delete attachments in every project in every collection but that would be overkill. I couldn’t find any existing documentation on the minimum privileges required by the Cleaner so I started with a user with zero TFS privileges and repeatedly executed the scheduled task, granting each permission mentioned in each successive error message until the task completed successfully.
For deleting attachments by extension and age I found the minimum permissions required were the following three, all at the Team Project level:
- View test runs
- Create test runs (non-intuitively, this permission allows attachments to be deleted)
- View project-level information
For deleting attachments based on linked bugs (something I didn’t try) I suspect the “View work items in this node” permission would also be required at the root Area level.
Having determined these permissions, I needed to apply them across all the Team Projects but it appears the only out-of-the-box way to set this permissions is via the Team Explorer user interface which becomes rather tedious after the first few projects. Instead I scripted the permission granting too via the TFS API and I’ve published some PowerShell cmdlets to make this easier if anyone else needs to do the same.
